Homemade Pizza Rolls can be called many different things. You may know them as pepperoni rolls, pepperoni pinwheels, pizza pinwheels, or pizza roll-ups. Regardless of their name, they're perfect if you're planning a football party, attending a potluck, or need something quick and easy for dinner! It's straightforward, allows for many variations, and just about everyone will love them.
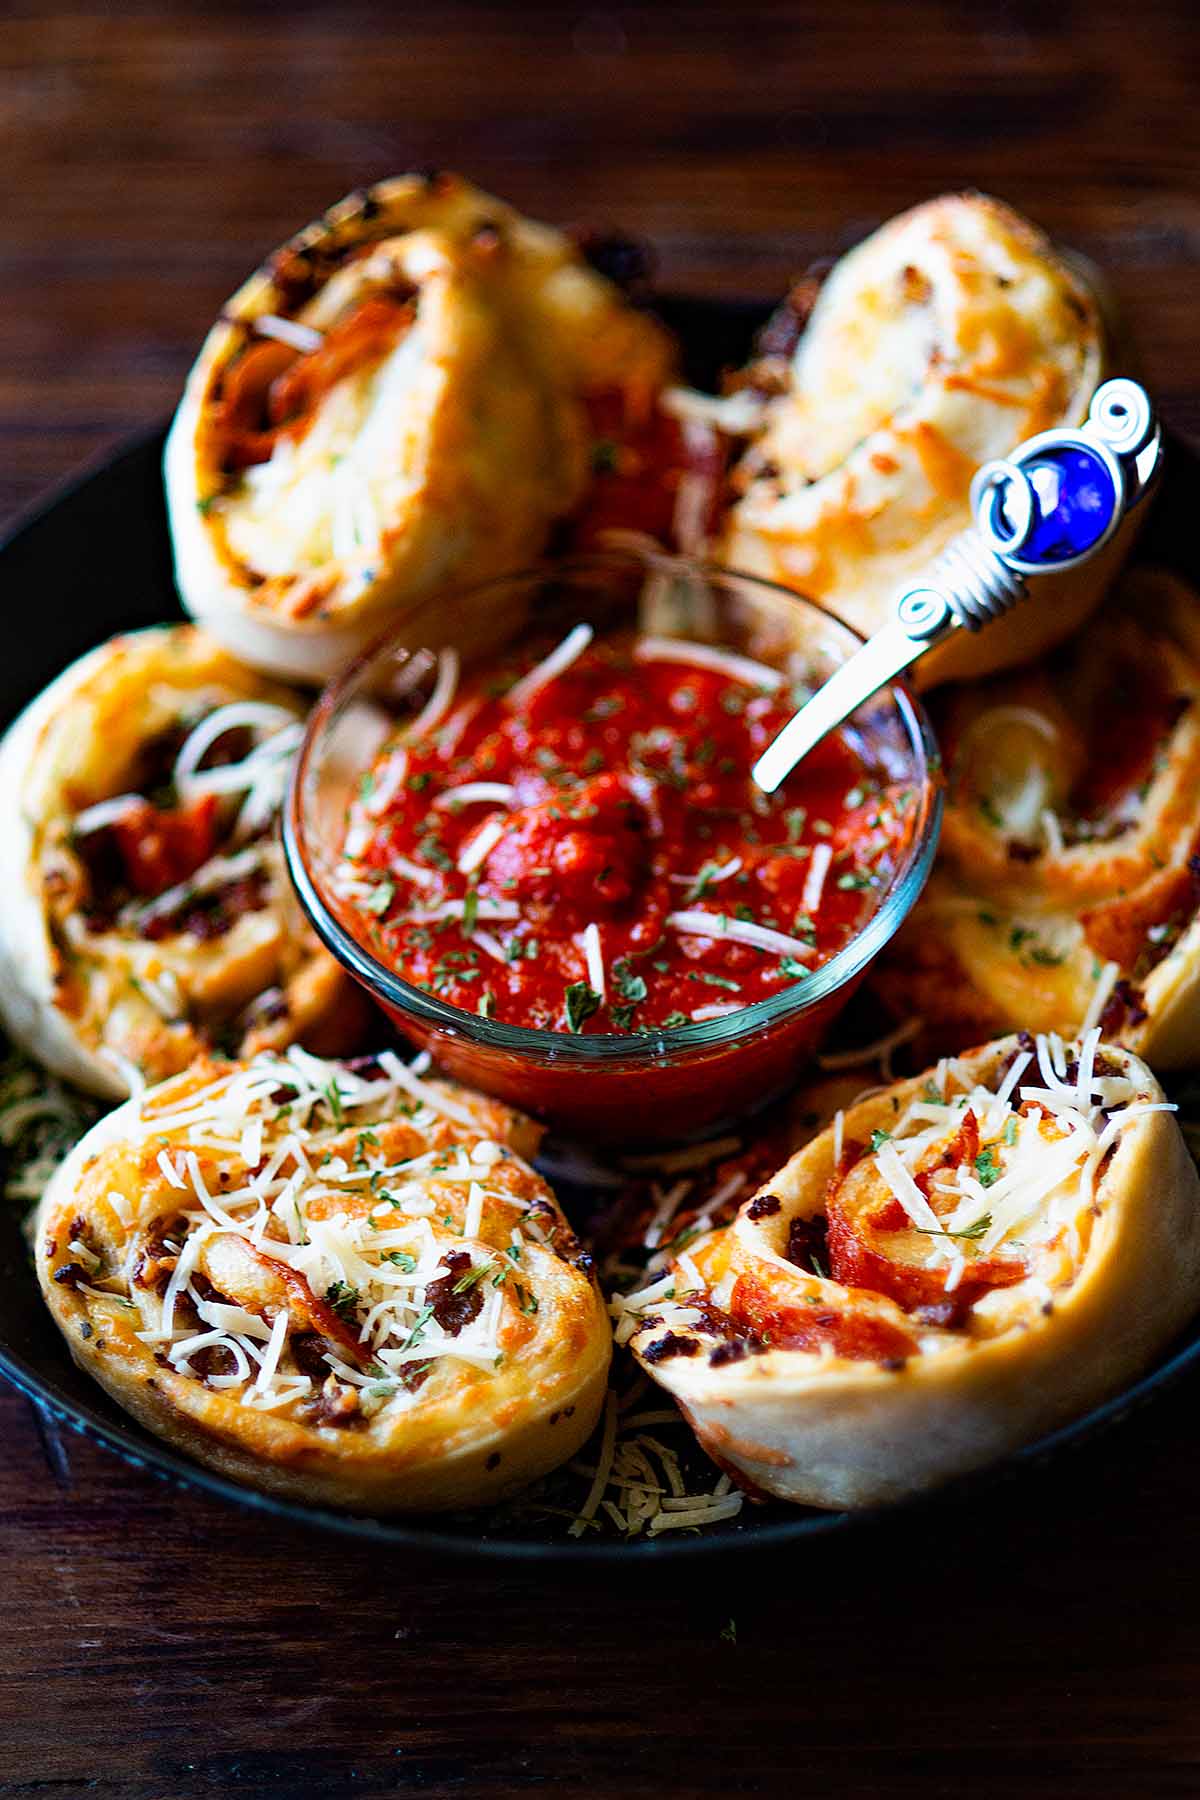
This is my version of an Old Chicago Sicilian Pepperoni Roll Copycat Recipe. It's not a replica, as I don't know what they put in theirs, but I know it needed some spicy Italian sausage and bacon added, so that's what I did!
Jump to:
Why You'll Love This Recipe
This Pepperoni Pizza Roll Recipe is super easy and fun to make, especially if you have kids. My family loves to help make them, but they love eating them even more! This isn't your typical Pizza Roll Recipe, and they certainly aren't what you'll find in the frozen food section at your local grocery store.
If you're looking for other amazing copycat recipes, check out this Mexican Pizza! It's the perfect Taco Bell copycat.
Ingredients
- Thick Cut Bacon
- Yellow Onion
- Ground Italian Sausage
- Thinly Sliced Pepperoni
- Pillsbury Refrigerated Pizza Dough
- Buttermilk Ranch Dressing
- Italian Seasoning
- Shredded Mozzarella Cheese
- Shredded Parmesan Cheese
By using Pillsbury Pizza Dough, there's no need to make your own, saving a ton of time.
You'll win the heart of any meat lovers pizza fan with crispy Bacon, Hot Homemade Italian Sausage, and thin sliced Pepperoni. And who doesn't love Buttermilk Ranch Dressing!?
See the recipe card below for full information on ingredients and quantities.
Step-by-Step Instructions
Preheat a Cast Iron Skillet over medium-high heat and add the bacon strips. Fry the bacon until crispy and set it aside on a cooling rack placed over a cookie sheet.
Reduce the heat to medium-low and add the diced onion to the same skillet. Sauté the onions until they begin turning translucent.
Now add the ground Italian Sausage to the skillet with the onions. Turn the heat to medium and brown the Sausage.
While the Sausage is cooking, cut up the bacon. Sometimes, I find it easier to use cooking shears, but you can also use a sharp knife.
Once the Sausage is fully cooked, remove the skillet from the heat. If there's too much grease, drain through a strainer or colander, then place the sausage and onion mixture back into the skillet. Now, add the bacon bits to mix, stirring to combine.
Preheat your oven to 425°f and line a baking sheet with foil. The foil will make for easier clean-up.
Next, remove the Pillsbury Refrigerated Pizza Dough from its package, unroll it, and place it on a lightly floured pastry mat. Using a rolling pin, lightly roll the dough to a thin, even rectangle.
Then, using a silicone spatula, spread the buttermilk ranch all over the pizza dough.
Next, lightly sprinkle the entire pizza dough with dried Basil, Oregano, and Parsley, or conversely, use your favorite premixed Italian Seasoning. What's a great Pizza Roll Recipe without Italian Seasoning?!
Evenly place the thinly sliced pepperoni all over the pizza dough and then lightly spoon the Italian sausage mix across the top.
Please don't go TOO crazy with the Sausage; otherwise, they'll be hard to roll up. It may seem like they aren't going to hold together well in the first place.
They will...Trust me!
Generously sprinkle the entire surface of the Pizza Dough with shredded mozzarella and parmesan.
However, save some of the parmesan to top the pizza rolls.
Lastly, roll the pizza rolls up from one short side of the rectangle to the other, then slice them using a metal dough scraper.
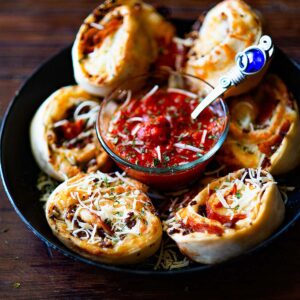
Place the rolls on the foil-lined baking sheet, sprinkle the top with freshly shredded parmesan, and bake for 15-20 minutes.
Expert Tips
- I serve these homemade pizza rolls with two sauces, an Arrabbiata and Marinara. If you don't already have a recipe of your own, I recommend Rao's Brand. The Arrabbiata is a bit spicy, whereas the Marinara is a little bit more on the sweet side. This way, your family or guests can pick which one they prefer.
- Be sure that the meat and onions cool before adding the mixture to your dough. Otherwise, it will soften the dough too much, making it harder to work with.
- Don't be afraid to get creative with this recipe and try different meats and cheeses. Just be careful not to over-fill them; otherwise, they won't stay together.
- Consider quickly crisping some prosciutto instead of the bacon for even more flavor and to stick with the overall Italian theme.
More Recipes You'll Love


If you made this Meat Lover's Pizza Rolls recipe or any other of my recipes, please leave a Star Rating and let me know your thoughts in the comments below.
Don't forget to tag @chickenfriedkitchen on Instagram, Subscribe on YouTube, and Follow on Pinterest and Facebook! I'll see you there!
📖 Recipe
Pizza Roll Recipe: A Meat Lover's Dream
Ingredients
- 3 Strips Thick Cut Bacon
- ½ lb Ground Italian Sausage
- 1 Pillsbury Refrigerated Pizza Dough
- Buttermilk Ranch Dressing
- ½ cup Yellow Onion
- Dried Basil
- Dried Oregano
- Dried Parsley
- 4 Oz Thinly Sliced Pepperoni
- Mozzarella Cheese - shredded
- Parmesan Cheese - shredded
FOR SERVING
- Arrabbiata, Marinara, or Your Favorite Sauce
Instructions
- Preheat a Cast Iron Skillet over medium-high heat and add the bacon strips. Fry the bacon until crispy, remove and set it aside on a cooling rack.
- Reduce the heat to medium-low and add the diced onion to the same skillet. Sauté the onions until they begin turning translucent.
- Add the ground Italian Sausage to the skillet with the onions. Turn the heat to medium and brown the Sausage.
- While the Sausage is cooking, cut up the bacon.
- Remove the skillet from the heat. If there's too much grease, strain in a colander.
- Place the sausage and onion mixture back into the skillet with the bacon bits, stirring to combine.
- Preheat your oven to 425°f and line a baking sheet with foil.
- Unroll the Pizza Dough on a lightly floured pastry mat. Lightly roll the dough to a thin, even rectangle using a rolling pin.
- Using a silicone spatula, spread the buttermilk ranch all over the pizza dough.
- Lightly sprinkle the pizza dough with dried Basil, Oregano, and Parsley. Or you can also use your favorite Italian Seasoning.
- Place the thinly sliced pepperoni all over the pizza dough and lightly spoon the Italian sausage mix across the top.
- Generously sprinkle the entire surface with shredded mozzarella and parmesan—Reserve some Parmesan to sprinkle on the top of the Pizza Rolls before baking.
- Roll the pizza rolls up from one short side of the rectangle to the other, then slice them using a metal dough scraper.
- Place the rolls on the foil-lined baking sheet, sprinkle the top with freshly shredded parmesan, and bake for 15-20 minutes.
- Remove and serve with your favorite sauces. (See my recommendations above)
Video

Notes
- I serve these homemade pizza rolls with two sauces, an Arrabbiata and Marinara. If you don't already have a recipe of your own, I recommend Rao's Brand. The Arrabbiata is a bit spicy, whereas the Marinara is a little bit more on the sweet side. This way, your family or guests can pick which one they prefer.
- Be sure that the meat and onions cool before adding the mixture to your dough. Otherwise, it will soften the dough too much, making it harder to work with.
- Don't be afraid to get creative with this recipe and try different meats and cheeses. Just be careful not to over-fill them; otherwise, they won't stay together.
- Consider quickly crisping some prosciutto instead of the bacon for even more flavor and to stick with the overall Italian theme.